Yin Yoga Sequence for Tight Hips
Practice this hip-opening Yin Yoga sequence to release your tight hips. Pictures and instructions included, as well as a video to practice along with me, and a poster for quick reference.

Hip-opening poses are some of the most requested stretches in my yoga classes. Why? With the lives that we lead nowadays, we spend a lot of time sitting in one position behind a desk or on the couch. This can take a significant toll on the mobility of our hips.
The hips play a big role in the stability of our bodies. Having tight hips can cause all sorts of aches and pains, including lower back pain. To help free them up, try the following Yin Yoga stretches.
WHY PRACTICE YIN YOGA TO OPEN UP THE HIPS?
Yin Yoga supports the connective tissues of the body by helping to lengthen and release the tension of these tissues surrounding our joints, which can encourage flexibility and mobility.
What differentiates Yin Yoga to other forms of more physical yoga practices, is that it is a slow and passive practice, with poses held in stillness from upwards of two minutes. By holding still in postures, there is very little muscular involvement. The focus is then on breathing to release the tension in the body, and allowing yourself to relax into the poses.
BEFORE YOU START PRACTICING THESE YIN YOGA POSES, READ THIS:
Do not stretch to your full range of flexibility for any Yin Yoga pose. Come to 60-80% of your range, and let your body open up slowly. It’s important to listen to your body and do what feels right for you. If you feel the stretch is too intense, pull back. If you don’t feel enough, allow yourself to go deeper slowly and gently.
Use props to support you in the poses. These could be blocks, bolsters, cushions, blankets, books, whatever you have available to you. There is no right or wrong way to use props. Place them where you feel is right for your body.
Try not to fidget, but strive to stay as still as possible to reap the full benefits of each pose. You can focus on your breath and count to help you relax and be still.
The poses in Yin Yoga are not always comfortable. Sometimes it will feel very intense and your mind may fill with thoughts of needing to come out of the pose immediately. But try to stay with it as long as you do not feel any sharp, burning, or pinching pain. Please back off or modify the pose if you feel these sensations.
4 YIN YOGA POSES FOR TIGHT HIPS
The following Yin Yoga sequence is designed to help you release tension around your hips and lower back, and increase your flexibility and mobility in these areas.

1. BUTTERFLY (OR BOUND ANGLE POSE)
Butterfly or Bound Angle Pose is a great stretch for the adductor muscles, or the inner thighs.
Bring the soles of your feet together and let your knees fall to the sides. It doesn’t matter if you feel your knees are far away from the mat. You can use a block under each knee for extra support.
Try to release any tension around your hips. So if you feel you are holding on or gripping, take a breath in and try to let the tension go with your breath out.
You can choose to sit upright if you already feel a stretch, or you can choose to walk your hands forward and fold over your legs.
Suggested props: a block under each knee; seated on a blanket; head resting on a bolster
Duration: 2-5 minutes
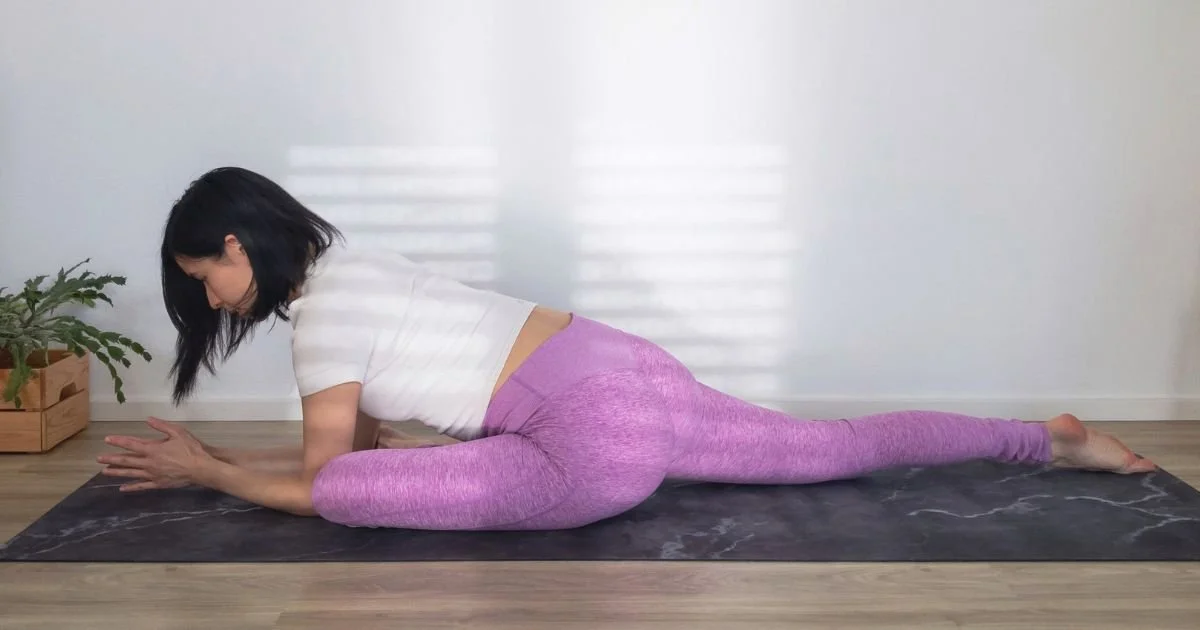
2. SLEEPING SWAN (OR PIGEON)
This pose helps to open the external rotators of the hip, including the piriformis muscles, which often contribute to sciatica pain.
From Downward Facing Dog or All Fours, bring your left leg forward with your foot towards your right hand, and your knee towards your left hand, then lower your hips. Try not to drop your hips over to one side, but stay in the centre. If there is space under your left hip, you may like to place a block or blanket underneath.
You have the option to keep your body upright, or walk your hands forward and fold over your bent leg.
Suggested props: a block or blanket underneath the hip of the bent leg; a bolster to rest your body on top
Duration: 2-5 minutes each side

3. DRAGON (OR LUNGE)
Dragon Pose is a deep hip and groin opener. The hip flexor of the back leg, and the hip socket of the front leg will get a good stretch.
Start from Downward Facing Dog or All Fours, and step your left leg forward to the outside of your left hand. Walk your left foot further forward if you need to in order for the ankle to be directly underneath your knee.
Modify the pose to make it more or less intense by bending or straightening the back leg, and/or placing hands on the mat or lowering onto your elbows.
Suggested props: a block under each hand; a blanket underneath the back knee
Duration: 2-5 minutes each side

4. CATERPILLAR (OR SEATED FORWARD FOLD)
Caterpillar is a great pose to stretch the spine and the hamstrings, and create more space in your hips.
From a seated position, stretch your legs out in front of you and fold forward from the hips. Allow your spine to round comfortably and keep your knees relaxed.
Suggested props: sit on a folded blanket; rest your head on a block; place a bolster or big cushion on top of your thighs and lie over it
Duration: 2-5 minutes

5. SAVASANA (OR CORPSE POSE)
The ultimate recovery pose. After a deep hip-opening practice, let your body relax and rest.
Lie down on your back with your arms to either side and palms facing up. Let go of all the tension in your mind and body, and allow yourself to surrender.
Suggested props: a blanket on top to keep warm; eye pillow
Duration: stay for as long as you like, minimum 2 minutes
Now that you have finished the practice, notice how your body feels. With time, your hips will become more mobile, and you may notice changes to other parts of your life as well. Leave a comment below and share your experience.
Take this class with me. Let’s practice the entire 15-minute sequence together.
